


A tent frame relies on continuous internal tension to hold poles together while campers pitch their shelter. When internal elastic wears out or snaps, learning how to repair a shock cord tent pole restores structural stability without forcing you to purchase a completely new frame set. Reliable pole tension ensures smooth pitching, keeps pole segments securely seated inside their ferrules, and prevents unexpected collapses when setting up weather-resistant camping tent options during challenging weather.
Most camping shelters use either aluminum or fiberglass poles strung with a stretchable internal core. Over time, recurring tension, temperature swings, and UV exposure degrade elastic rubber strands until pole segments no longer pull together naturally. Replacing this cord requires simple workshop supplies, basic knots, and a careful process for stringing sections in proper sequence. Taking the time to service your poles revitalizes your tent structure and keeps your outdoor shelter ready for upcoming trips.


Practical Guide to Restoring Tent Pole Elastic
Internal elastic cords exist to hold segmented tent poles in sequential order while providing enough elasticity for folding. When this cord slackens, setting up a tent becomes frustrating because pole segments slide apart while you push them through fabric sleeves. Restoring that tension requires understanding cord dynamics, segment layout, and proper fastening methods. Approaching the repair methodically ensures your tent frame regains factory handling without risking segment misalignment.
Recognizing When Internal Shock Cord Needs Replacement
Tent pole shock cords degrade gradually before failing entirely. The most obvious sign of wear occurs when poles fail to snap together when unfolded, leaving loose loops of cord hanging between metal or fiberglass sections. Campers may also observe that individual segments slip out of their joint ferrules while arching the frame into tent corner grommets. These issues indicate that the internal rubber strands have lost their elasticity from continuous strain or environmental aging.
Sub-freezing temperatures often cause brittle rubber cores to lose flexibility temporarily or snap under sudden tension during cold camping trips. High heat and humidity inside storage sacks can also soften natural latex cores, leading to permanent stretching. Inspecting pole segments before every camping trip prevents unexpected setup failures at the campsite. Fraying outer jackets present another clear warning sign that internal fibers are about to sever completely.
Selecting the Proper Replacement Cord Diameter
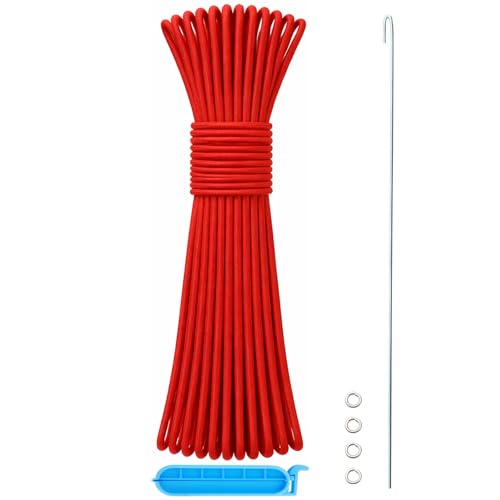
Replacement shock cords for camping tents generally come in two standard thicknesses: 1/8 inch (approximately 3.2 mm) and 3/32 inch (approximately 2.5 mm). The 1/8-inch thickness provides robust elasticity and abrasion resistance, making it suitable for standard family camping shelters and heavy fiberglass poles. Options like AceCamp 1/8 Inch Shock Cord Pole Repair and Chapou Tent Pole Repair Kit 200ft 1/8” Shock feature standard 1/8-inch dimensions designed for wide compatibility. Selecting a cord that matches the internal diameter of your poles ensures smooth threading without binding.
Smaller backpacking shelters and ultralight aluminum poles often require 3/32-inch elastic cord. Products like BRILLIANCE4U Tent Pole Shock Cord 3/32 in 60ft provide the narrower diameter needed to navigate compact aluminum ferrules. Using an oversized cord inside narrow poles creates excessive friction that impedes smooth folding. Conversely, placing an undersized cord inside large fiberglass poles can provide inadequate pull force, allowing segments to separate under breeze loads.
Essential Tools and Workspace Organization
Organizing appropriate tools beforehand streamlines the restringing process and prevents frustrating mistakes. A clean floor space allows you to lay out pole sections in their natural configuration without mixing up end pieces. Having a pair of sharp scissors, a standard lighter, masking tape, and locking pliers or binder clips nearby will make tensioning manageable. Masking tape is especially helpful for numbering segments before taking the assembly apart.
A stiff wire guide serves as an invaluable aid when threading elastic through long pole sections. Kits such as Tent Pole Shock Cord 1/8 inch 60ft or the Chapou repair bundle supply steel lead wires specifically designed for this purpose. If your replacement roll lacks an installation wire, a straightened wire coat hanger or heavy monofilament line works as a functional alternative. Small steel washers are also necessary to anchor cord ends inside pole tips when built-in fasteners are missing.
Disassembling Pole Sections and Maintaining Layout
Disassembly begins by inspecting both terminal ends of the assembled pole. Most modern tent poles terminate with metal tips that lock into corner grommets or hub assemblies. In many designs, these tips unscrew or pop out, revealing an internal knot or retaining washer secured to the elastic cord. If your pole features press-fit aluminum tips, gently wiggling the tip with pliers while protecting the finish with cloth loosens the component.
Once you reveal the knot, pull the cord outward slightly and untie or cut the knot while maintaining a firm grip. Carefully slide off the first pole section and set it down in line on your work surface. Continue pulling the cord through each subsequent segment, keeping every tube facing the same direction. Laying each pole section down end-to-end creates an accurate visual template for restringing.
Preserving segment orientation is crucial for tents with contoured or pre-bent pole geometries. Many contemporary family shelters, including various spacious camping tents, utilize curved ridge poles or graduated diameters to maximize interior headroom. Inverting even a single segment can alter the pole arch, preventing the tent rainfly from fitting squarely over the inner canopy. Keeping the segments strictly organized on the floor prevents structural issues during pitch reassembly.
Determining Tension and Cord Stretch Ratios
Determining correct shock cord length requires balancing relaxed fit with sufficient tension. A general guideline for tent poles is calculating approximately 65 to 75 percent of the fully assembled pole length. For instance, a 12-foot pole typically requires roughly 8 to 9 feet of relaxed shock cord. If the cord is cut too long, segments will feel loose and separate during setup; if cut too short, pole joints will resist folding.
Do not cut your replacement cord from the roll before threading the sections. Keeping the cord attached to the master spool allows you to adjust tension progressively without wasting material. Threading directly from the spool also provides extra cord slack to hold onto while securing knots. You can cut and seal the cord end after verifying the tension across the entire assembled frame.
Threading Pole Sections and Securing Intermediate Slack
Begin restringing by anchoring the initial cord end at the first terminal pole piece. Tie a secure stopper knot, such as a figure-eight knot or double overhand knot, around a steel washer or directly into the pole end tip. Pull the knot firmly to confirm it cannot slip through the terminal opening under pressure. Once anchored, slide the cord through the first hollow pole segment until it emerges from the ferrule end.
Continue guiding the cord sequentially through each numbered section using your lead wire. When threading through long sections, gravity can assist by holding the pole vertically and dropping the weighted wire lead downward. As the cord exits each segment, clamp a spring binder clip or locking pliers padded with tape onto the exposed cord. This temporary clamp keeps the elastic from retracting back inside earlier sections while you position the next pole.
Pull moderate tension on the cord as you add sections to avoid compounding loose slack. The clamp method allows you to take breaks, reposition segments, and check ferrule alignments without losing your progress. Ensure that male inserts face female receivers uniformly across every connection point. Maintaining orderly clamping guarantees an even distribution of elasticity throughout the finished pole length.
Anchoring Terminal Knots and Checking Frame Action
When the cord exits the final pole section, pull sufficient tension to establish the final working stretch. Grasp the cord where it exits the tube and pull out enough length to stretch the cord comfortably past the terminal tip. Apply your locking clamp right against the pole opening to hold this tension securely while your hands remain free. This locked state allows you to tie the terminating knot without fighting elastic recoil.
Thread the final end tip or metal washer onto the tensioned cord. Tie a substantial stopper knot, ensuring it rests flush against the washer or internal tip cavity. Trim excess cord leaving roughly one inch of tail, and lightly melt the freshly cut fibers with a flame. Release the clamp slowly, guiding the knot and end tip back into its seating position at the end of the pole.
Clearing Internal Ferrules and Smoothing Sharp Edges
Occasionally, replacement shock cord snags inside a pole segment during threading. This friction usually stems from metal burrs, dirt buildup, or fractured fiberglass strands inside the tube. Inspecting the interior rim of each ferrule with a flashlight reveals rough edges that can snag cord jackets. Smoothing interior metal lips with a rolled piece of fine-grit sandpaper eliminates sharp edges that could sever fresh cord.
Aluminum ferrules can also become slightly oval-shaped after being stepped on or compressed in transit. A misshapen joint opening pinches both the connecting pole insert and the internal shock cord, restricting elastic movement. Gently rounding out compressed ferrule openings using needle-nose pliers restores proper clearance. Keeping ferrule joints round and clean prevents premature cord wear and ensures segments lock together cleanly.
Fiberglass poles require extra inspection for hairline longitudinal cracks along joint collars. Damaged fiberglass can splinter into the interior channel, cutting elastic fibers under tension and weakening the frame. Applying clear epoxy or a tight repair sleeve over minor surface cracks stabilizes the pole section before stringing new cord. Proper structural inspection is especially important when maintaining shelters like dark-room camping tents, where taut fabric tension relies heavily on rigid, unbroken pole geometry.
Proper Storage and Packing Habits to Protect Elastic
Adopting proper packing and storage routines greatly extends the functional life of replacement shock cord. When breaking down tent poles, always fold segments starting from the center rather than one end. Folding from the middle distributes elastic strain evenly across both halves of the cord, reducing localized stretching. Working inward from the center prevents the outermost cord sections from bearing excessive tension during folding.
Storage climate directly impacts how long elastic rubber stays supple. Storing poles in hot attics, damp basements, or direct sunlight accelerates rubber dry rot and jacket breakdown. Keep tent poles in a cool, climate-controlled indoor space alongside your dried tent canopy. Ensuring pole segments are completely dry before packing prevents internal moisture from deteriorating synthetic cord fibers.
Regular pre-season checks help you catch minor cord issues before they disrupt a camping trip. Unfold your pole sets each spring, inspect the elasticity, and check for frayed spots along joint ferrules. Replacing tired cord before it fails completely saves valuable campsite setup time and keeps your frame dependable. With basic maintenance and quality replacement cord, your repaired tent poles will provide years of steady support on the trail.



Write Your Review
No reviews yet. Be the first to share your experience!