


Pitching a reliable shelter in the backcountry depends on stable structural poles that snap together cleanly and hold tension under wind loads. When the internal elastic line loses its springiness or snaps entirely, knowing what size shock cord for tent poles makes the difference between a fast repair and a frustrating campsite failure. Most camping domes and backpacking shelters rely on standard internal elastic cords to keep segmented aluminum or fiberglass rods aligned during setup. Keeping your frame in working order ensures dependable performance alongside durable weather-ready camping tents that face harsh mountain weather.
Selecting the proper cord diameter ensures the elastic slides effortlessly through narrow ferrule openings while retaining enough pulling power to collapse and fold the pole assembly neatly. Installing a line that is too thick creates severe friction inside the pole shafts, while an undersized cord lacks the tensile pull required to keep sections seated securely. Replacement cord spools from brands like AceCamp, Chapou, and BRILLIANCE4U provide dedicated outdoor repair options in diameters ranging from 3/32 inch to 1/8 inch. Exploring the nuances of internal pole clearance, elasticity ratios, and knot allowances will help you choose the ideal cord for your specific shelter.


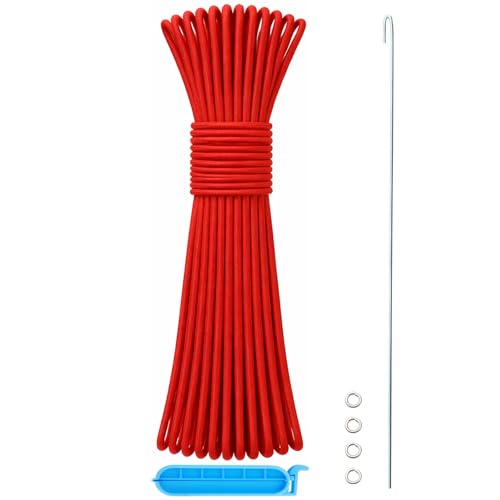
Everything You Need to Know About Tent Pole Shock Cord Sizing
The standard shock cord diameter for the vast majority of family camping, car camping, and recreational backpacking tents is 1/8 inch (approximately 3 millimeters to 3.2 millimeters). Ultralight backpacking shelters with narrow aluminum tubing frequently use 3/32 inch (approximately 2.4 millimeters to 2.5 millimeters) shock cord to fit through restricted internal ferrules. In rare cases involving heavy outfitter frames, oversized canopy structures, or large family cabin setups, manufacturers specify a thicker 5/32 inch cord. Identifying which of these sizes matches your tent requires examining the internal diameter of the tubing, the ferrule design, and the terminal end tips.
Standard Shock Cord Diameters Across Camping Tent Frames
The outdoor industry overwhelmingly treats 1/8 inch shock cord as the universal standard for recreational camping poles. Most standard 8.5-millimeter to 11-millimeter aluminum and fiberglass poles feature hollow cavities engineered specifically around this gauge. It delivers the ideal balance between elasticity, tensile strength, and long-term durability under repetitive folding cycles. If you own an everyday two-person, four-person, or six-person camping dome, a standard 1/8-inch cord spool will almost always fulfill your replacement requirements.
Lightweight backpacking tents prioritize shaved ounces and minimal packed volume, which results in much narrower pole profiles. Shelters that utilize poles with an outer diameter between 7.5 millimeters and 8.5 millimeters typically lack the internal clearance for standard elastic lines. For these streamlined aluminum frames, 3/32 inch elastic cord serves as the preferred standard. This thinner diameter compresses easily through compact internal collars without binding or bunching during pole assembly.
Substantial basecamp shelters, outfitter canvas tents, and commercial shade canopies occasionally operate on heavy-duty fiberglass or steel poles. These structures handle significant canopy weight and broad surface areas, necessitating heavier elastic tension to keep hefty sections coupled together during pitching. When pole tubes exceed 13 millimeters in outer diameter, a 5/32 inch or even 3/16 inch shock cord might be employed by the manufacturer. However, standard dome tents rarely accommodate cords of this thickness because the internal ferrule passages are too narrow to allow smooth movement.
How Internal Tube Clearance and Ferrule Design Dictate Cord Size
Choosing the correct cord size is not determined by the outer diameter of the pole, but rather by the narrowest internal point along the tube. Aluminum poles feature swaged ends or insert ferrules that step down inside the tube to create a snug joint for the adjoining segment. Fiberglass poles use external metal sleeves, but the internal resin core can contain rough ridges that snag thicker elastic lines. If you attempt to pull a 1/8-inch cord through an insert meant for a 3/32-inch line, friction will quickly jam the entire assembly.
The insert ferrule represents the primary choke point in any segmented tent pole system. As the cord stretches during assembly and collapses during pack-up, it must travel back and forth through every internal ferrule without catching. When an elastic cord fits too tightly, friction against the metal edges will strip the braided outer sheath in just a few camping trips. A properly sized cord glides freely through these internal transition points without bunching, catching, or wearing out premature fibers.
Terminal end tips and grommet locking mechanisms also present strict sizing limitations for your replacement cord. Most tent poles terminate with either an aluminum insert tip that slots into a corner grommet or a hollow plastic cap designed for a ball-and-socket system. The shock cord is anchored inside these tips using an overhand knot backed by a small metal washer. If your replacement cord is too thick, the resulting knot will be too bulky to seat inside the tip, preventing the pole from locking properly into the tent base.
Measuring Existing Shock Cord and Sizing Without Calipers
Measuring an old, degraded shock cord directly can produce misleading measurements that complicate your repair. As elastic shock cord ages, internal rubber strands degrade, dry out, and lose their natural rebound tension. An old line that has been stretched over several camping seasons often appears significantly narrower than its original manufactured gauge. Conversely, a cord whose outer woven sheath has bunched up or frayed can appear thicker than its true uncompressed size.
The most accurate way to verify cord size is to measure the internal opening of the pole tips and ferrules rather than the tired elastic itself. A simple drill bit set functions as an excellent manual sizing gauge if you do not own a set of digital calipers. A 1/8-inch drill bit measures approximately 3.18 millimeters, while a 3/32-inch drill bit measures roughly 2.38 millimeters. By testing which drill bit shank slides cleanly through the ferrule opening without forcing, you can quickly identify the maximum clearance available for your cord.
Examining the unknotted end of the original cord near the terminal tip provides another reliable point of reference. Because the cord near the end cap experiences minimal flexing compared to the center joints, it usually retains its original diameter. Snip a fresh half-inch piece from this protected section, allow the rubber core to rest in an unstretched state, and compare it against standard dimensional charts. If the relaxed piece sits right at 3 millimeters, you can confidently purchase 1/8-inch replacement shock cord.
Calculating Replacement Cord Length and Establishing Tension
Determining the correct length of replacement shock cord requires understanding tension ratios rather than matching the total length of your pole. If you cut your replacement cord to the exact measurement of your assembled pole, it will possess zero resting tension and fail to draw the segments together. The established rule of thumb among outdoor repair specialists is to cut your cord to approximately 65 percent to 75 percent of the assembled pole length. This reduction provides sufficient elastic pull to hold the segments seated while allowing enough stretch to fold the sections comfortably.
Striking the proper balance of tension directly affects how smoothly your shelter pitches at the campsite. Modern easy setup outdoor tents rely on responsive pole tension to let campers erect large canopies quickly without pole sections constantly separating. If the cord is cut too short, excessive tension will make folding the pole segments difficult and may crack fiberglass ferrules under extreme strain. Conversely, a cord with less than 65 percent tension will sag, causing pole joints to disengage while you are sliding the frame through tent sleeves.
Campers who venture out in sub-freezing weather should adjust their tension calculations slightly to account for cold temperatures. Extreme cold causes natural rubber cores to stiffen, which reduces overall elasticity and makes the cord feel noticeably tighter. For three-season camping, a 70 percent length ratio delivers consistent performance across warm and mild conditions. For dedicated winter or high-altitude mountaineering, increasing the cord length to roughly 75 percent or 80 percent prevents the cold-stiffened elastic from snapping under high tensile loads.
Material Differences: Latex Rubber, Synthetic Elastomers, and Sheath Fabrics
The interior core of a shock cord dictates its elastic rebound, tensile longevity, and response to weather fluctuations. High-grade replacement cords, such as those supplied in quality repair kits, utilize multiple strands of vulcanized natural latex rubber. Natural latex provides superior memory and elastic recovery, allowing the cord to stretch up to double its length repeatedly without permanently sagging. Lower-grade synthetic solid cores may offer initial elasticity, but they tend to suffer from permanent stretch deformation much faster under sustained tension.
The exterior braided jacket shields the vulnerable rubber core from abrasive metal pole edges and environmental degradation. Most quality replacement cords use tightly woven nylon or polypropylene fibers for this outer protective layer. Nylon sheaths provide outstanding abrasion resistance and slide smoothly across metal ferrules without fraying or catching. Polypropylene jackets offer excellent moisture resistance and do not absorb water, making them well-suited for humid camping environments and wet weather conditions.
Visual tracer lines woven into the exterior jacket offer a functional advantage during installation and routine maintenance. Many replacement cord rolls incorporate contrasting colored tracer strands running along the length of the braid. These contrasting patterns allow you to spot twist buildup in the cord before you tie off the final knot, ensuring the elastic pulls evenly through every section. They also make measuring and cutting exact lengths much easier when you are working on a crowded workbench or repair table.
Step-by-Step Restringing Procedure for Segmented Poles
Before cutting any cord, lay your entire tent pole assembly flat along the ground in a straight, fully connected line. Keep the segments in their exact original sequence, noting which ends feature male insert ferrules and which feature female openings. Disassembling the pieces randomly is a frequent mistake that leads to backwards segments and ruined pole geometry. Once the pieces are laid out in order, measure the total length of the assembled pole and calculate your target cord length based on the 70 percent guideline.
Remove the terminal tip from one end of the pole assembly to expose the original knot and retaining washer. Untie or cut this terminal knot, and pull the degraded cord out through all the individual segments. If the old cord has snapped inside the tubing, you can use a long leader wire to push or snag the loose fragments out of the channel. Clean any loose dirt, dried mud, or oxidation from the inside of the tube joints before beginning the restringing process.
Thread your new shock cord through the first segment, attach a steel washer, and tie a firm overhand or figure-eight knot at the terminal end. Pull the knot firmly against the washer and reseat the terminal end tip into the pole tube. To pass the cord through subsequent segments smoothly, use a thin steel lead wire or a straightened coat hanger taped to the leading edge of the elastic. Push the wire through each hollow section one at a time, keeping moderate tension on the cord as you progress along the pole.
As you thread through multiple sections, the accumulating tension will attempt to pull the cord backward into the tubing. Use a small spring clamp, a binder clip, or locking pliers wrapped in masking tape to clamp the cord securely against the exit opening of each segment. This temporary clamp holds your accumulated stretch, leaving your hands free to work on the next piece without fighting the elastic. Once the cord exits the final segment, pull the line to achieve your predetermined tension, slide on the final washer, knot the end securely, and reseat the end tip.
Common Restringing Pitfalls and How to Avoid Them
The most common mistake during restringing is cutting the replacement shock cord before passing it through the entire pole frame. Tying knots, threading narrow inserts, and pulling tension often consume several inches of cord that are difficult to estimate beforehand. Always work directly from the main spool, allowing excess line to trail behind you until the final tension is confirmed. Only trim the shock cord after your final terminal knot is tied, inspected, and properly seated inside the end tip.
Another frequent pitfall is tying an oversized terminal knot that cannot recess into the pole cavity. When a knot is too large, the end tip cannot seat flush against the aluminum rim, leaving the pole joint loose and unstable. If a standard figure-eight knot proves too bulky for your specific pole tip, switch to a neat overhand knot backed by a flat steel washer. Applying a tiny drop of clear craft glue or fray-check to the trimmed knot end prevents the woven sheath from unraveling over time.
Failing to inspect the internal edges of ferrule joints can quickly sabotage your newly installed shock cord. Burrs, sharp metal shavings, or cracked fiberglass edges can act like miniature blades that slice through elastic fibers. Before pulling your fresh cord through old poles, run a small piece of fine sandpaper or an emery cloth around the inner lips of each metal collar. Smoothing these contact zones ensures the elastic travels effortlessly without catching or developing micro-tears during routine camp pitching.
Pole Care, Storage Habits, and Extending Elastic Lifespan
How you store your camping tent between trips plays a massive role in how long your shock cord maintains its elasticity. Storing poles in hot environments such as attics, vehicle trunks, or uninsulated garages rapidly bakes the natural rubber core, causing it to lose elasticity within a couple of seasons. Always store your tent frame in a cool, dry, climate-controlled indoor space where temperatures remain moderate year-round. This simple storage adjustment can easily double the functional lifespan of both original and replacement shock cords.
Caring for your poles properly is especially vital when packing up spacious outdoor tents for group trips that feature long, multi-segment frames under heavy structural load. Always break down your poles starting from the center joint rather than one end, working outward toward the tips. Disassembling from the center distributes elastic strain evenly across both halves of the internal cord, preventing excessive stretching at the ends. Never let pole sections snap together violently under elastic tension, as the metal impact can flare or crack the ferrule collars.
Never pack tent poles away while they are damp from rain, condensation, or morning dew. Moisture trapped inside hollow aluminum or fiberglass tubes promotes rapid oxidation and degrades synthetic cord sheaths with mildew growth. If you are forced to pack up camp during a rainstorm, slide the poles out of their storage sack as soon as you return home and allow them to dry completely. A clean, dry internal channel protects both the structural integrity of the tube and the elastic elasticity of your shock cord.
Choosing the right shock cord comes down to matching your pole’s internal ferrule clearance with standard 1/8-inch or 3/32-inch elastic lines. Taking a few moments to measure your tube opening, calculate a 70 percent tension length, and install the cord with proper lead wires ensures your camping shelter remains dependable for years of outdoor adventures. Keep an extra spool of 1/8-inch cord and a small set of washers in your gear bag so you are always prepared to handle a quick trailside repair.




Write Your Review
No reviews yet. Be the first to share your experience!