


Pitching your shelter after a long day on the trail should be a straightforward task, but an elastic line that has lost its elasticity turns setup into a frustrating ordeal. Knowing exactly how much shock cord for tent pole restoration is required prevents loose pole sections from separating in the wind while ensuring the poles fold cleanly into your gear bag. Campers dealing with aging poles or sudden cord failure can easily restore original tension without replacing entire pole sets. Whether you maintain lightweight backpacking poles or broad fiberglass frames for easy setup tents, calculating the correct cord length makes all the difference.
A proper repair balance requires enough tension to keep aluminum or fiberglass ferrules seated tightly while leaving enough slack for effortless breakdown. Cutting the cord too short can strain internal latex cores and snap the line, while excess cord causes sections to rattle and slip apart during pitching. Even robust, heavy-duty water-resistant camping tents depend on reliable frame integrity to maintain structural rigidity under shifting wind and rain loads. In this guide, you will learn the exact length formulas, diameter options, and step-by-step replacement practices to keep your tent poles performing reliably on every trip.


Comprehensive Sizing and Restringing Guide for Tent Pole Shock Cords
Determining the right amount of elastic cord for your shelter frame does not require guesswork. As a standard baseline, measure your fully assembled tent pole from end to end and cut your replacement cord to roughly seventy to seventy-five percent of that total length. This ratio supplies enough contraction force to draw pole segments securely together while preserving the elasticity needed to fold the frame. Factoring in an extra eight to twelve inches for tying terminal knots ensures that your finished assembly operates smoothly in the field.
The Measurement Formula for Single-Pole Runs
To calculate the cord requirement, lay out all connected pole sections on a flat surface in their fully assembled state. Measure the total length of the pole run in inches, including the internal sleeve extensions known as ferrules. Multiply that total length by 0.70 for fiberglass poles or 0.75 for aluminum poles that experience frequent flex. For example, a pole measuring 144 inches requires roughly 101 to 108 inches of relaxed cord to achieve optimal operating tension.
Always add an extra eight to twelve inches of working length before making any final cuts. This extra slack allows you to manipulate the cord through washers, around end tips, and into secure knots without fighting tension. Trimming cord too close to your calculated measurement leaves little room for knot tying and risks accidental slippage. Once the knots are locked in place, you can trim the excess tail and singe the fibers with a flame.
Why Elastic Tension Controls Structural Stability
The shock cord inside a tent pole serves a crucial dual function during camping trips. When you pitch your shelter, the cord contracts to pull ferrule joints into tight alignment, preventing loose connections from shifting under wind load. When you strike camp, the cord must stretch significantly so each segment folds neatly alongside its neighbor. Achieving the proper balance between static contraction and dynamic stretch ensures that neither function is compromised during regular outdoor use.
Cutting the cord too short creates excessive resting tension inside the hollow tubing. When severe tension is sustained, the inner rubber strands degrade quickly and can pull end tips inward through narrow tube openings. Overly tight cords also resist folding, making it difficult to pack the frame into standard stuff sacks. Conversely, cutting a cord too long leaves pole sections loose, allowing ferrules to slip apart while you slide the pole through tent fabric sleeves.
Selecting Cord Thickness: 1/8 Inch Versus 3/32 Inch
Tent pole shock cords generally come in two standard diameters: 1/8 inch (about 3.2 millimeters) and 3/32 inch (about 2.5 millimeters). Options like the AceCamp 1/8 Inch Shock Cord Pole Repair and the Hibinew Tent Pole Shock Cord 1/8 inch 60ft represent the standard size found in traditional dome tents and family cabin frames. This 1/8 inch thickness delivers dependable pulling power and fits comfortably inside standard fiberglass and larger aluminum tubing. Its thicker outer jacket also provides enhanced abrasion resistance against interior tube burrs.
For ultralight backpacking shelters and compact technical tents, 3/32 inch cord offers a lighter, lower-profile solution. Kits like the BRILLIANCE4U Tent Pole Shock Cord 3/32 in 60ft cater specifically to poles with narrow internal clearance where thicker elastic would bind. Thinner cord slides through narrow ferrule inserts with minimal friction, making repairs on compact frames much smoother. Before purchasing bulk replacement line, inspect your original cord or measure the inner diameter of your pole tips to confirm clearance.
Core Materials and Exterior Sheath Construction
The lifespan of replacement shock cord depends on the materials used in its core and protective outer sheath. Natural latex rubber cores, featured in options like the Hibinew and Chapou cord sets, provide high elasticity and consistent rebound over repeated flexing cycles. Synthetic rubber cores offer decent durability, but natural latex retains its memory more effectively when stored under tension. A resilient core ensures that your pole sections snap together crisply rather than feeling sluggish during pitching.
The outer braided jacket shields delicate elastic strands from mechanical wear against internal metal edges and ferrule lips. High-density polypropylene or woven nylon jackets, such as the 100 percent nylon exterior found on AceCamp lines, resist moisture and abrasion. Many modern repair cords also feature contrasting tracer threads, like the red and black patterns on Chapou rolls, which help you track cord twist during installation. A tight, smooth weave prevents snagging as the line feeds through long hollow sections.
Essential Tools and Hardware for Restringing
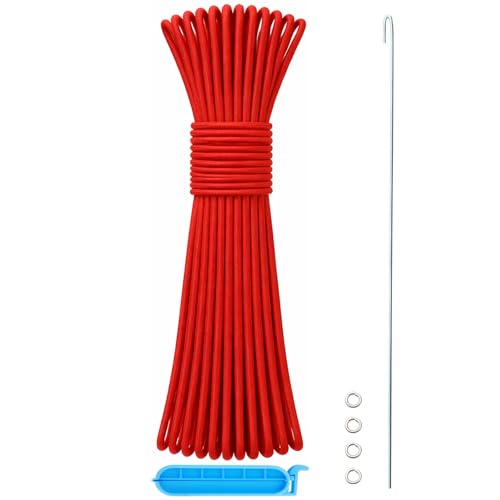
Gathering the proper tools before starting your repair simplifies the restringing process and prevents frustrating delays. A stiff steel lead wire is the most critical item, acting as a flexible needle to guide floppy elastic cord through narrow pole segments. Replacement kits like the Chapou Tent Pole Repair Kit 200ft 1/8” Shock and the Hibinew packages bundle dedicated lead wires specifically for this job. You will also need sharp scissors, a lighter to seal cut ends, and masking tape to organize sections.
Terminal hardware is equally essential to keep the tensioned elastic securely anchored inside the tube ends. Small steel washers, included in kits from BRILLIANCE4U, Chapou, and Hibinew, prevent anchor knots from pulling through open ferrule ends. Locking clips or padded pliers can hold the tensioned cord outside the pole while you attach consecutive segments. Working on a wide table gives you ample space to layout parts in precise linear order without misplacing components.
Preparing Pole Sections and Disassembling Old Cord
Begin the repair by examining how the original cord is anchored at both ends of the pole assembly. Most poles secure the shock cord using either a threaded end tip, an internal washer knot, or an external friction plug. Use pliers or your fingers to unscrew or extract the end tip from the first section to access the internal knot. Cut the knot to release the old elastic, and pull the degraded cord out completely from the opposite end.
As you remove the old cord, keep all pole segments arranged in their exact operational order and orientation. Labeling the sections with numbered tape prevents accidental reversal of male and female ferrule joints. Take this opportunity to inspect each individual pole section for hairline cracks, splintering fiberglass, or bent metal inserts. Wiping away grit from inside the tube joints ensures that your new replacement cord slides smoothly without picking up abrasive debris.
Step-by-Step Threading and Tensioning Method
Attach the leading end of your new shock cord to your steel lead wire by folding the wire into a tight hook. Tie a sturdy stopper knot, such as a figure-eight knot, at the trailing end of the cord and slide a steel washer against it. Insert this anchored end into the first pole segment, ensuring the washer seats firmly against the end tip or internal shoulder. Gently pull the cord to confirm that the knot will not slip through under heavy tension.
Feed the lead wire through the first pole segment, pulling the cord through until it emerges from the opposite opening. Continue threading through consecutive segments one by one, keeping the joints separated by several inches on your work surface. As you add more sections, friction increases, requiring steady guidance rather than forceful pulling. Avoid twisting the elastic inside the tube, which can cause binding and uneven tension distribution across the pole run.
Once the cord exits the final pole section, grip the line firmly and pull it taut to establish your calculated operating tension. Clamp a pair of locking pliers or an included plastic clip against the cord where it exits the tube to hold the tension safely. Slide your final washer and end tip onto the exposed line, tie your terminal knot, and release the clamp slowly. Allow the pole sections to pull together naturally, verifying that all ferrules seat fully without binding.
Working with Aluminum Versus Fiberglass Pole Structures
Aluminum and fiberglass poles exhibit different internal characteristics that influence how shock cord behaves during installation. Aluminum poles feature smooth, precision-machined internal surfaces that allow elastic cord to glide effortlessly without catching. They are common on technical shelters and high-capacity models where weight savings and stiffness are critical. Restringing aluminum frames on large shelters, such as spacious family camping tents, requires careful handling to avoid scratching protective anodized coatings on tube rims.
Fiberglass poles, by contrast, are heavier and often have slightly rougher internal surfaces created during extrusion. These poles use glued metal ferrule sleeves that can develop sharp internal edges over years of hard use. Inspecting the lip of each ferrule sleeve before restringing prevents premature fraying of your new cord jacket. Smoothing rough metal edges with fine sandpaper creates a safe, smooth pathway for the elastic cord to travel over time.
Restringing Hubbed Poles and Complex Canopy Frames
Modern tent designs often move away from simple continuous pole runs in favor of intricate hubbed pole configurations. In these systems, several pole segments radiate outward from a central aluminum or composite hub casting. Specialized shelters, including modern dark room camping tents with steep sidewalls, frequently utilize hubbed assemblies to maximize interior living space. Each radiating branch in a hubbed system generally functions as an independent shock cord run rather than one continuous line.
When restringing a hubbed frame, calculate the cord length for each radiating branch independently using the standard 70 percent rule. Thread the cord outward from the hub junction toward the outer corner tip, anchoring the inner knot inside the hub cavity. Never attempt to run a single continuous shock cord through a central hub to feed opposing branches. Treating each arm as a self-contained unit ensures balanced tension and simplifies future maintenance if an individual pole segment suffers damage.
Troubleshooting Restringing Obstacles and Common Errors
Several predictable obstacles can arise while restringing camping poles, but each problem has a practical remedy. If the lead wire jams inside a ferrule transition, rotate the wire gently rather than forcing it forward against resistance. Jamming usually occurs when the wire tip catches on an internal ferrule shoulder or dried glue residue. If the braided sheath begins to fray during threading, immediately trim the end and singe the fibers with a lighter to maintain a clean profile.
Another common mistake involves losing control of the tensioned cord before tying the final terminal knot. If the cord slips back inside the pole, you must unthread the preceding sections to retrieve it safely. Using a dedicated spring clamp or padded locking pliers prevents this slippage while protecting the elastic core from crush damage. Taking your time and double-checking knot security before releasing the clamp ensures a trouble-free installation on every repair.
Storage Practices to Maximize Shock Cord Lifespan
Proper storage techniques protect your newly installed shock cord from premature degradation between camping seasons. Always break down tent poles by separating the middle joint first, then folding subsequent sections toward the ends. This technique distributes elastic tension evenly across all internal folds rather than concentrating extreme stretch on a single joint. Never collapse poles by yanking sections apart violently, which stresses the elastic and weakens glued ferrule bonds.
Store your tent and pole sets in a cool, dry environment away from direct sunlight and severe temperature swings. High heat inside hot attics or car trunks accelerates the breakdown of internal rubber strands, leaving cords brittle and slack. Storing poles completely dry also prevents internal corrosion that could abrade cord sheaths over time. Inspecting your frame tension before every major excursion allows you to perform quick adjustments at home rather than facing gear failure at camp.
Mastering the simple formula for tent pole shock cord replacement gives you complete control over your camping gear maintenance. By cutting your replacement elastic to roughly seventy to seventy-five percent of your assembled pole length and accounting for knot allowances, you ensure optimal frame tension and dependable field performance. Taking the time to select the right diameter, prepare proper threading tools, and protect your poles during storage guarantees that your shelter stands strong across countless outdoor adventures.


Write Your Review
No reviews yet. Be the first to share your experience!