


Pitching a tent after a long trek quickly becomes frustrating when an elastic frame pole goes limp and refuses to snap into alignment. Over time, heat, damp storage conditions, and repeated pitching cause the internal elastic strands to stretch out or snap completely. Learning how to replace tent pole bungee cord restores reliable tension to your shelter framework without the expense of ordering an entirely new pole assembly. Even robust shelters like heavy duty water resistant camping tents rely on properly tensioned poles to resist wind shear and shed heavy rainfall effectively.
Restringing an elasticized pole set is an accessible maintenance task that requires minimal gear and a little patience. With a spool of fresh shock cord, a basic threading tool, and a few secure knots, you can refurbish aluminum or fiberglass poles in under an hour. Taking the time to service tired frame segments ensures your camping gear remains dependable and ready for unexpected trail conditions.


Complete Guide to Replacing Tent Pole Shock Cord
Restoring the elastic cord inside a camping tent pole is one of the most rewarding gear maintenance tasks you can perform at home. A fresh internal shock cord keeps individual pole segments linked in their proper order while providing enough pull to seat ferrules securely during setup. When that internal tension slackens, pitching your shelter becomes an awkward struggle against slipping segments and misaligned joints. Understanding the mechanical components, cord specifications, and threading techniques turns an intimidating repair into a straightforward maintenance routine.
Recognizing When Tent Pole Elastic Needs Replacement
Tent pole bungee cords rarely fail without giving off clear warning signs across several camping outings. The earliest symptom is loose elastic that fails to pull neighboring pole segments together when you unfold the frame on the ground. You may notice segments sliding apart spontaneously or sagging while you try to guide them through fabric pole sleeves. When elastic stretches out completely, setting up your shelter requires constant readjustment to keep joints seated.
Extreme weather exposure often accelerates the breakdown of internal rubber filaments. Cold mountain temperatures cause degraded rubber to lose elasticity completely, leaving the cord stiff and unresponsive. In hot environments, trapped warmth inside packed tents can bake the rubber core, resulting in brittle strands that snap under moderate pitching tension. Inspecting your frame before long trips ensures you catch brittle filaments before they snap in the field.
Selecting the Correct Shock Cord Diameter and Materials
Selecting the appropriate cord thickness is critical for smooth assembly and long-term durability. Most standard camping tents utilize 1/8-inch elastic shock cord, which balances tensile strength with ease of movement through hollow pole cavities. Thicker cord may bind inside narrow aluminum segments, while thinner cords may lack the contractile pull needed to hold heavy fiberglass rods together. Matching cord diameter to the interior bore of your poles prevents friction jams during restringing.
Compact backpacking frames and ultralight shelters frequently feature narrow poles that require specialized thinner elastic. For these tighter channels, a 3/32-inch diameter cord, such as Coghlan’s Replacement Shock Cord Kit, provides adequate elasticity without jamming at internal ferrule joints. Checking the inner diameter of your pole segments before purchasing replacement spools prevents frustrating clearance issues during threading. Measuring your existing cord or checking manufacturer specifications confirms whether your frame requires standard or slim elastic.
Cord construction also influences longevity and resistance against outdoor elements. Quality replacement cords incorporate natural latex or rubber cores wrapped inside high-density woven polyester, polypropylene, or nylon sheaths. Brands like Abma Cord and AceCamp offer tightly braided jackets that resist internal friction, moisture rot, and fraying against metal edges. A sturdy outer weave protects the flexible core from sharp metal edges at ferrule connection points.
Essential Supplies and Workspace Setup
Preparing a clean, organized workspace prevents lost components and keeps pole segments arranged in their exact sequence. A flat floor, driveway, or long workbench provides enough continuous space to lay out the entire assembled pole from end to end. Good lighting ensures you can peer down hollow tubes to spot internal obstructions or stuck washers. Working in a clear area also stops small metal tips and washers from rolling out of sight.
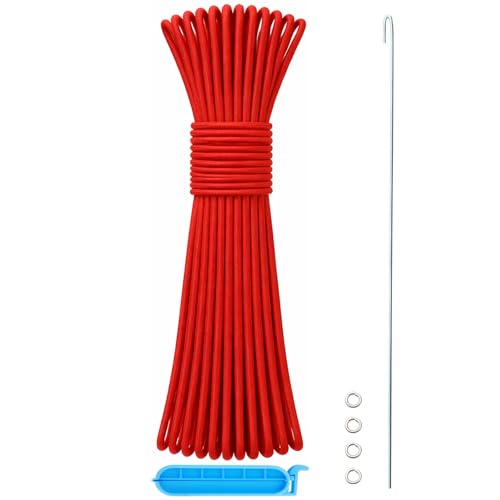
Having the right mechanical accessories on hand dramatically speeds up the restringing process. A stiff wire guide, such as the steel lead wires included in Chapou or Hibinew repair kits, helps guide floppy cord through long, narrow pole shafts. Small steel washers or terminal clips are necessary to anchor cord ends firmly against pole tips without pulling through. A pair of scissors, a pocket lighter to melt cut ends, and a temporary clamp complete your repair kit.
Disassembling Poles and Preserving Segment Sequence
Preserving the original order of your tent pole segments is essential for a successful repair. Many modern tents utilize pre-bent elbow joints, tapered ends, or varying segment wall thicknesses that must sit in precise positions along the frame arch. Laying out the pole straight and labeling each tube with numbered masking tape guarantees correct reassembly. Keeping each segment oriented in the same direction prevents backwards installation later in the process.
Begin disassembly by examining the terminal end tips of the pole assembly. Most tent poles utilize either friction-fit metal tips, threaded screw-in inserts, or notched plastic caps designed to seat into tent corner grommets. Gently pull the tip away from the end segment to expose the anchored knot or metal retention washer inside. If the tip is stuck firmly, wrapping the plug in a soft cloth before gripping it with pliers prevents gouging the metal.
Once the anchor knot is visible, untie the knot or snip the degraded cord just behind the retention washer. Withdraw the old shock cord completely from the opposite end of the pole assembly and discard the damaged line. Take a moment to peer through each hollow segment to ensure no broken elastic fragments remain lodged inside. Clearing out grit and old fibers now ensures the fresh cord passes through without catching on hidden debris.
Calculating Accurate Cord Length and Tension
Calculating the correct length of new shock cord requires finding the right balance between holding tension and mechanical flexibility. If the cord is cut too short, excessive tension will make folding the poles difficult and put unnecessary strain on the elastic core. Conversely, leaving the cord too long results in loose segments that pull apart during pitching. Striking the proper balance ensures the pole snaps together crisply while collapsing smoothly into your gear bag.
A reliable standard guideline is to measure the new shock cord to roughly 70 to 75 percent of the total assembled pole length. For example, a 12-foot tent pole generally performs best with approximately 8.5 to 9 feet of relaxed shock cord. This proportional sizing ensures sufficient tension when segments seat together while leaving adequate stretch to collapse the poles into compact bundles. Flexible fiberglass rods may tolerate slightly firmer tension, whereas lightweight aluminum frames favor moderate elasticity to protect ferrules.
If you prefer to measure dynamically, thread the new cord through the segments and pull it taut until firm resistance is felt. Mark the cord at the exit point while holding tension, then allow an extra six to eight inches for tying secure terminal knots. Testing the tension before making permanent cuts saves valuable cord and prevents frustrating re-work. It is always safer to start with slightly more cord length, as you can easily shorten it if the fit feels loose.
Threading the Replacement Cord Through Pole Sections
The threading process begins by anchoring the cord securely at one end of the first pole segment. Thread the cord through a small steel washer and tie a robust figure-eight or double overhand knot at the very end. Test the knot by pulling firmly to confirm that it cannot slip through the center hole of the washer or into the hollow pole tip. Singeing the cut end lightly with a flame melts loose nylon strands and seals the knot permanently against fraying.
Guide the unanchored end of the shock cord through each subsequent pole segment in consecutive order. If the cord tip is soft and bends inside the pole, seal the cut end briefly over an open flame to create a stiff, pointed plastic tip. When working on longer sections or frames for spacious outdoor tents, taping the cord to a rigid steel lead wire allows you to push the line straight through multiple tubes in seconds. Feeding the wire steadily prevents kinks and ensures the cord glides past internal ferrule shoulders smoothly.
Pay close attention to the orientation of male and female ferrule joints as you thread each segment. The cord must enter the open tube and exit through the matching ferrule without twisting around itself. Ensure each pole section faces the identical direction as documented during your initial workspace layout. Catching a reversed segment during threading saves you from having to strip the entire line and start over.
Applying Working Tension and Securing the Terminal End
As you pass the cord through the final pole segment, you must stretch the elastic to build the necessary operating tension. Pull the cord firmly out from the open end until the entire pole line pulls together snugly without slack at any joint. Maintain a firm grip on the extended cord to prevent it from snapping backward through the hollow tubes. Holding steady tension ensures each ferrule seats completely flush against its adjoining tube.
Secure a spring clamp, small locking plier, or heavy binder clip directly onto the exposed cord right at the mouth of the final pole segment. This temporary clamp holds the elastic under tension, freeing both of your hands to install the final anchor hardware. Take care not to pinch the cord so hard that you crush the protective woven sheath. The clamp acts as a secure mechanical stop while you thread the remaining retention washer and pole tip.
Slide the second terminal washer or pole plug over the taut cord beyond the clamp. Tie another secure figure-eight knot tightly against the washer, pull the knot completely snug, and trim any excess line leaving a half-inch tail. Release the clamp slowly and guide the knot into the pole tip so the tension seats the end cap flush against the tube rim. Once seated, the pole should pull together into a unified, firm arch ready for pitching.
Navigating Multi-Hub Geometry and Complex Pole Frames
Many contemporary camping frames feature molded plastic or cast aluminum hubs that connect three or more pole branches together. In these designs, each branch often functions as an independent shock-corded line anchored directly at the central hub socket. Rather than threading a single long line through the entire frame, treat each hub arm as a distinct restringing task. Labeling each hub socket with tape ensures each pole branch returns to its designated angle.
Advanced shelters with dark room technology, such as specialized dark room camping tents, often incorporate rigid pre-bent corners to maximize vertical wall space. These pre-curved segments can catch flexible cord tips as they navigate the bend during threading. Using a flexible lead wire or feeding the cord through while rotating the curved section gently eliminates friction snags. Pushing the wire slowly through the bend protects both the cord jacket and the inner tube wall.
If your tent pole features internal ferrules with sharp edges, inspect the metal rims for manufacturing burrs before threading new elastic. A quick rub with fine-grit sandpaper or a round needle file smooths jagged metal lips that might otherwise slice through fresh cord jackets. Taking extra care around joint transitions ensures your new shock cord glides smoothly without catching or fraying over years of use. Clean, de-burred joints also slide together more easily during cold-weather pitching.
Troubleshooting Slipping Knots and Segment Misalignment
Even with careful preparation, minor snags can arise during cord installation and initial testing. A frequent issue occurs when an anchor knot pulls through a washer under full stretch, causing the cord to snap back into the pole interior. To prevent this, always verify that the knot diameter significantly exceeds the inner diameter of the washer hole, or use two stacked washers for added security. Checking knot security before releasing working tension prevents sudden internal snaps.
Another common frustration happens when pole segments refuse to fold completely once the repair is finished. This issue typically indicates that the cord was strung under excessive tension, leaving insufficient elastic stretch to span folded pole joints. If folding feels unusually stiff, loosen the terminal knot, feed out an additional two or three inches of cord, and re-anchor the tip. Proper tension should allow the pole to fold in half without fighting significant mechanical resistance.
If you discover that two adjacent pole segments were accidentally installed backward, do not attempt to force them together. Disassemble the terminal knot at the nearest end, back the cord out to the affected joint, correct the tube orientation, and re-thread the line. Taking the time to correct alignment errors immediately protects the pole metal from stress fractures during campsite pitching. Forcing mismatched ferrules together damages the aluminum collar and ruins frame geometry.
Maintenance Practices for Prolonged Cord Life
Proper handling and storage techniques significantly extend the working lifespan of fresh shock cord. When striking camp, always break down pole assemblies starting from the center rather than one end. Folding poles from the middle balances tension evenly across the entire elastic length, reducing localized strain on the outer segments. Working outward from the center also minimizes whip action that can damage metal ferrules.
Environmental management plays an equally vital role in preventing rubber degradation. Never store tent gear in hot attics, metal sheds, or car trunks where trapped summer heat bakes elastic cords. Ensure aluminum pole tubes are thoroughly dry inside before stowing them away, preventing internal corrosion and powdery oxidation that abrades the cord sheath during setup. Storing poles in a cool, dry closet keeps rubber filaments resilient season after season.
Confirming Structural Integrity Before Your Next Campout
Performing a complete mock setup in your yard or living room verifies the repair before you head into the wilderness. Assemble the entire pole arch and flex it gently into its natural pitching curve to confirm that all ferrule joints remain flush and secure under bending stress. The pole should form a smooth, continuous arc without popping apart at any section. Verifying the bend profile ensures the tent fabric will sit evenly without localized pressure points.
Next, disassemble the frame and fold it into its standard packed bundle to ensure the cord stretches smoothly around every elbow fold. The segments should fold cleanly side-by-side without pulling the internal elastic to its absolute mechanical limit. Confirming smooth folding guarantees fast, hassle-free shelter assembly when arriving at camp after dark or during foul weather. Restringing tired poles restores crisp handling, protects your shelter fabric, and extends the useful life of your trusted outdoor equipment.


Write Your Review
No reviews yet. Be the first to share your experience!