


Assembling a shelter at dusk becomes frustrating when internal pole tension suddenly goes slack. The internal elastic line that joins aluminum or fiberglass pole sections will eventually stretch, fray, or lose elasticity after multiple seasons of temperature fluctuations and field use. Learning how to repair tent shock cord restores structural integrity to your frame, making campsite pitching fast, predictable, and secure once again. Even rugged frames designed for heavy-duty water-resistant camping tents rely on flexible interior tensioning to keep nested segments aligned during strong gusts.
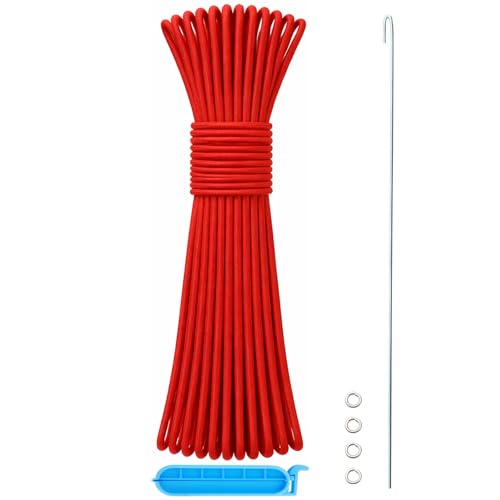
Replacing dead elastic does not require technical certifications or expensive specialty gear. A basic replacement kit containing fresh elastic cord, a simple guide wire, and a few washers can quickly bring your tent frame back to peak performance. Routine pole maintenance helps prevent bent ferrules, cracked fiberglass segments, and unnecessary fabric stress caused by loose pole joints. Taking time to service your gear at home ensures reliable field performance before your next wilderness excursion.


Restoring Pole Tension: A Practical Tent Shock Cord Repair Guide
Tent poles rely on internal elastic shock cord to keep segmented tubes organized and snug during pitching. When that cord deteriorates, assembling a shelter transforms from a quick routine into an awkward wrestling match with flopping segments. Replacing this elastic is one of the most accessible maintenance tasks an outdoor enthusiast can perform at home. With the right diameter cord and a systematic approach, you can restore full structural tension to your tent frame in less than an hour.
How Shock Cord Functions Inside Camping Tent Poles
The primary purpose of tent shock cord is convenience and assembly speed rather than load-bearing support. Once pitched, the tent fabric, guy lines, and frame geometry support the shelter against wind and precipitation. Inside the hollow poles, the elastic cord simply draws adjacent male and female joints together so they seat completely. Without adequate tension, pole sections can dislodge partially from their ferrule sleeves, which creates weak points that easily buckle under sudden wind gusts.
Both aluminum alloy and fiberglass poles use similar interior elastic configurations. Aluminum poles generally feature hollow tubes with pressed or glued metal inserts, while fiberglass poles often use external metal ferrules bonded to solid or hollow composite rods. In both styles, the cord threads through the entire hollow core and anchors securely at both terminus tips. Understanding this simple internal channel helps you visualize how new cord will travel smoothly through the assembly.
Symptoms of Failing Elastic and When to Re-Cord
Elastic shock cord naturally degrades over time due to repeated stretching, ozone exposure, and temperature swings. The most obvious indicator of failure is a cord that droops loosely between folded pole sections without snapping back. You might also notice dry rot, where the outer braided jacket frays and the inner rubber strands break into powdery white fragments. If your poles repeatedly fall apart during pitch setup, the cord has lost its working elasticity and requires complete replacement.
Extreme cold weather can also reveal underlying cord degradation. Sub-freezing temperatures cause natural latex and synthetic rubber cores to stiffen, drastically reducing their contracting power. While healthy cord retains enough elasticity to pull sections together in freezing conditions, aging cord will remain slack and extended. Addressing worn cord before cold-weather outings prevents dangerous setup delays when ambient temperatures drop rapidly.
Selecting Cord Diameter, Length, and Materials
Choosing the correct diameter is essential for smooth internal travel through the pole segments. The standard industry size for modern backpacking and family camping tents is one-eighth inch cord, which equates to roughly three millimeters. Thinner cords can break prematurely under high tension, while thicker cords create too much friction inside narrow aluminum pole channels. Kits such as the AceCamp one-eighth inch replacement cord or the Hibinew shock cord provide standard dimensions suitable for most recreational tent designs.
Cord construction also plays a significant role in long-term durability and weather resistance. Premium cords feature an interior core of natural latex rubber or resilient synthetic rubber wrapped in a tightly woven jacket. A braided nylon or polypropylene outer sheath protects the elastic core from sharp metal edges, abrasion, and moisture absorption. Options like the Chapou replacement cord incorporate contrasting tracer lines into the outer weave, which helps visual alignment and accurate measurement during the repair process.
Determining the proper cord length requires a simple calculation rather than guessing. An effective baseline is cutting your new shock cord to approximately seventy to seventy-five percent of the total assembled pole length. This ratio provides enough resting tension to pull joints firmly together without over-stretching the rubber core when sections fold for storage. If you make the cord too short, folding the poles becomes nearly impossible and risks snapping the elastic strands.
Essential Tools and Workspace Preparation
Setting up a clear, clean work area prevents lost hardware and unneeded frustration. Clear a long hallway floor, garage table, or driveway where you can lay the entire tent pole out in a straight line. Having ample room ensures you do not mix up the sequence or orientation of individual pole segments. Small hardware pieces like end tips and metal washers can roll away easily, so placing a clean towel or tray nearby keeps everything secure.
Gathering a few basic household tools makes the rethreading process smooth and efficient. You will need sharp utility scissors, a lighter to singe frayed synthetic cord ends, and masking tape or a binder clip to hold tension. A stiff steel lead wire is practically indispensable for pushing elastic through narrow aluminum tubes without bunching. Repair kits from brands like Chapou and Hibinew conveniently include dedicated threading wires, steel washers, and clips to streamline this exact task.
Disassembling the Pole and Inspecting Components
Begin the disassembly process by inspecting how the existing cord anchors at each pole terminus. Most tent poles utilize removable end tips that either screw into the tube, press fit into place, or clip directly into tent grommets. Carefully unscrew or pull out the end tip on one side to expose the knot holding the shock cord. If the end tip is tightly friction-fitted, gripping it with padded pliers usually eases it free without marring the aluminum surface.
Once the first anchor knot is exposed, cut the old cord and pull the dead elastic completely out from the opposite end. As you remove the cord, keep all pole segments aligned in their exact original sequence. Pole sections often have specific male insert orientations or varied wall thicknesses, so mixing up their order can compromise frame geometry. Take this opportunity to inspect each ferrule joint for hairline stress cracks or sharp internal burrs that could damage the new cord.
Step-by-Step Cord Replacement Procedure
Start the installation by preparing the leading edge of your new shock cord. Melt the cut tip briefly with a lighter and roll it between your fingers using a damp cloth to create a hard, tapered point. Secure your starting end by threading the cord through a small washer and tying a robust knot, such as a double overhand knot. Insert this knotted washer into the first pole section and firmly reseat the corresponding end tip into the tube opening.
Attach the free end of your shock cord to the provided steel guide wire using a piece of tape or the wire loop. Thread the guide wire through the first pole segment, pulling the elastic line all the way through the tube. Once the cord emerges from the far end, pull it taut and clamp a binder clip or locking pliers against the pole opening. This clamping technique holds accumulated tension securely so you do not fight the elastic pull while working through subsequent sections.
Continue threading the guide wire and cord through each remaining pole segment in order. Large family shelters and spacious outdoor tents for group trips often feature lengthy pole assemblies spanning twenty feet or more. For these longer frames, work patiently one section at a time, repositioning your temporary clamp as you advance. Clamping the cord after every two or three sections maintains manageable tension and prevents the elastic from snapping backward through the pole.
Securing the Final Node and Reinstalling End Tips
After the shock cord exits the final pole section, you must set the definitive tension before cutting. Pull the cord until the entire pole assembly draws together naturally with firm joint engagement. While holding the cord under tension with your clamp, slip a final steel washer onto the free end. The washer acts as an essential stopper, preventing the anchoring knot from pulling through the narrow opening of the pole cap.
Tie a durable overhand or figure-eight knot tightly against the washer, leaving an inch of tail. Test the tension by folding the pole into thirds to ensure the elastic stretches comfortably without bottoming out. Once you confirm the tension feels balanced across all joints, trim any excess cord and singe the raw tail with a flame. Reinstall the final end tip firmly into the pole end to complete the closed mechanical loop.
Field Repairs and Temporary Campsite Fixes
A severed shock cord at a backcountry campsite can feel catastrophic, but simple field remedies keep your shelter operational. If the elastic snaps mid-trip, you can still pitch the tent because the poles remain structurally sound once fully seated. Carefully assemble the pole sections by hand, ensuring every male insert slides completely into its mating ferrule without binding. You can use strips of duct tape or friction tape across the joints to temporarily prevent sections from separating during setup.
If you happen to carry a compact survival kit with extra paracord or safety wire, you can fashion a makeshift guide to tie broken cord segments together. Even tying a simple square knot between severed internal pieces can provide enough tension to get through a weekend excursion. Carrying a small emergency repair sleeve and a replacement spool like AceCamp 65-foot cord in your vehicle provides valuable peace of mind on remote expeditions. Permanent restringing is best reserved for a clean, stable work surface back home.
Preventing Premature Shock Cord Wear and Dry Rot
Proper pole folding technique is one of the most effective ways to prolong the lifespan of your shock cord. Always break down tent poles by separating the middle joint first, then folding subsequent sections toward the ends. This technique distributes elastic tension evenly throughout the cord instead of concentrating severe stretching on one end. Folding poles haphazardly from one side repeatedly overstretches the final segments, leading to uneven elongation and premature failure.
Storage conditions also dictate how long natural latex and synthetic rubber cores retain their elasticity. Always allow tent poles to air dry thoroughly before packing them into storage sacks to prevent internal corrosion and mildew buildup. Storing gear in hot attics, damp basements, or direct sunlight accelerates rubber breakdown and jacket dry rot. Maintaining clean, dry equipment protects your frame just as thoughtful care preserves the specialty fabrics found on modern dark-room camping tents.
Practical Takeaways for Long-Lasting Tent Frames
Restringing tent poles requires only modest mechanical effort and pays substantial dividends in campsite reliability. By understanding pole anatomy, choosing resilient one-eighth inch cord, and using a systematic clamping method, anyone can restore factory-level tension. Regularly inspecting pole joints for hairline cracks and smooth ferrule engagement ensures your shelter withstands challenging weather without sudden structural compromises. Well-maintained poles seat cleanly, flex smoothly, and make every wilderness setup fast and effortless.
If you discover bent metal ferrules, crushed tube ends, or splintered fiberglass during your repair, replacing those specific segments is crucial before restringing. Most tent manufacturers offer individual replacement sections that integrate directly into existing pole architectures. Pairing fresh tubing with high-grade shock cord completely revives aging frames at a fraction of the cost of buying a new shelter. Routine inspection and timely cord replacement ensure your camping shelter remains dependable for countless future adventures under the stars.


Write Your Review
No reviews yet. Be the first to share your experience!