


Campers often encounter the frustration of a slack, frayed, or completely snapped internal elastic line while pitching shelter at a campsite. Elastic shock cord inside collapsible poles holds aluminum or fiberglass segments in sequence, making assembly fast while preventing individual sections from wandering off in your pack. Learning how to replace cord in tent pole assemblies restores proper structural tension so your shelter pitches quickly and stands securely against changing elements. Taking the time to service tired poles before a camping trip prevents annoying delays when setting up camp in windy or wet conditions.
Over multiple seasons of temperature swings and repeated stretching, even durable bungee cores lose elasticity and leave poles limp during setup. Addressing worn elastic lines before heading into the backcountry keeps your shelter dependable, whether you maintain ultralight trekking poles or heavy-duty frames found on weather-ready outdoor shelters. The repair requires only basic household items, replacement shock cord, and a little patience to thread sections in proper sequence. A straightforward restringing job extends the working life of your tent framework without requiring an expensive replacement pole set.


Step-by-Step Guide to Replacing Shock Cord in Tent Poles
Restringing a tent pole assembly requires methodical preparation and an understanding of how internal elastic tension functions. A tent pole is essentially a series of hollow metal or composite tubes connected by an internal elastic core that pulls the joints snugly together. When that elastic fails, the poles collapse into loose pieces, making canopy pitching awkward and reducing structural stability. Following an orderly replacement process allows you to rebuild the internal tension system cleanly and return your shelter frame to full working condition.
Recognizing the Warning Signs of Failing Tent Pole Shock Cord
Elastic shock cord degrades over time through a combination of environmental exposure and repeated mechanical stretching. The most obvious indicator of failure occurs when you pull poles out of their storage sack and notice significant slack between individual pole segments. If the elastic does not pull the segments together on its own, or if the cord hangs loose outside the ferrules, the internal rubber core has lost its elasticity. In severe cases, the outer braided sheath bunches up inside the pole tubes, jamming the joints and preventing proper ferrule engagement.
Environmental factors accelerate the breakdown of internal rubber strands inside the braided sheath. Storing poles in hot attics, damp basements, or direct sunlight causes the elastic polymers to dry out and snap under normal tension. Moisture trapped inside metal pole tubes after a rainy camping trip can also rot older cotton or untreated synthetic sheaths. Catching these warning signs during seasonal gear inspections gives you ample time to complete the repair before arriving at a remote campsite with unusable poles.
Selecting the Correct Replacement Cord Diameter and Materials
Choosing the appropriate shock cord thickness ensures that the cord moves freely inside the pole segments while maintaining sufficient tension. Most backpacking and standard camping tent poles accommodate either 3/32-inch (approximately 2.5 mm) or 1/8-inch (approximately 3.2 mm) elastic bungee cord. Thin poles commonly found on ultralight tents require 3/32-inch cord because thicker lines create excessive friction against narrow internal tube walls. Heavier fiberglass or large-diameter aluminum poles benefit from 1/8-inch cord, which provides stronger pull and greater resistance to surface abrasion.
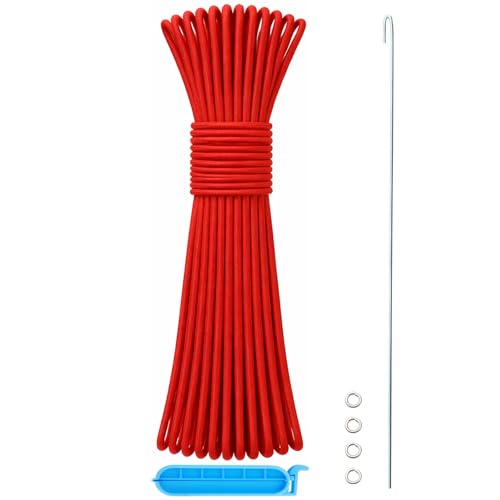
Core construction plays a central role in how long the replacement cord maintains its elasticity under tension. Quality replacement cords typically feature natural latex rubber multi-strand cores wrapped in tightly woven polypropylene or polyester exterior jackets. Polypropylene provides smooth gliding action inside metal ferrules while resisting moisture absorption and mildew growth. Repair kits from brands like Hibinew and BRILLIANCE4U supply long rolls of durable shock cord alongside essential installation accessories such as steel guide wires and locking washers.
Purchasing continuous spools measuring 60 feet or longer ensures that you have adequate material for multiple pole arches and extra margin for knotting. Many spacious group camping tents feature multi-pole frameworks spanning considerable lengths that consume substantial amounts of shock cord during a full overhaul. Having extra cord on hand allows you to cut generous working leads and leaves leftover material for field repairs or gear tie-downs.
Gathering Required Tools and Workspace Preparation
Assembling the right tools prior to disassembly prevents frustration and keeps the repair process moving smoothly. You will need a pair of sharp utility scissors, needle-nose pliers, a standard lighter for heat-sealing cord ends, a tape measure, and painter’s masking tape. A thin, stiff steel guide wire or lead wire is particularly valuable for threading flexible cord through long, narrow tube segments. A small spring clamp or binder clip will also help hold intermediate tension as you work along the pole length.
Setting up an organized workspace makes a significant difference when handling long multi-segment tent poles. Clear a wide, flat work area on a clean floor, driveway, or large table where the entire pole can stretch out without tangling. Collapsible poles consist of male and female ends that must remain in their original sequence to assemble properly later. Using strips of painter’s tape to number each segment in sequential order guarantees that you do not accidentally invert or misplace a section during the restringing process.
Disassembling the Pole and Removing Worn Elastic Cord
Disassembly begins at one of the pole terminal ends, which usually features an aluminum end tip, plastic grommet plug, or threaded insert. Some pole tips pull straight out with gentle leverage from needle-nose pliers, while others unscrew or rely on friction fit against the tube wall. Once you remove the terminal plug, you will expose the original retaining knot or washer holding the shock cord inside the tube. If the knot is jammed tightly, use your pliers to grip the tip and pull the knot free from the tube opening.
Cut the knot off with scissors to release the cord from the first terminal anchor. Hold onto the loose end of the cord and begin sliding the individual pole sections off one by one, keeping them lined up in their numbered order. If the old cord is completely severed inside the pole, use a long piece of stiff wire or an untwisted metal coat hanger to push the trapped pieces out. Take care not to deform the aluminum ferrules or scratch the inner tube surfaces while clearing out old elastic remnants.
Inspect each cleared segment carefully before introducing new shock cord into the system. Check the ends of each ferrule for sharp metal burrs, bends, or hairline cracks that could slice through new elastic fibers under tension. Wipe away accumulated grit, fine campsite dirt, and moisture from the inside and outside of each section using a dry rag. Ensuring clean, smooth internal channels prevents premature cord wear and makes threading the new bungee line noticeably easier.
Calculating Proper Shock Cord Length and Elastic Tension
Establishing the correct cord length is essential for achieving proper operational tension across the entire pole arc. As a general rule, the relaxed length of your replacement shock cord should equal roughly 70 to 80 percent of the pole’s total assembled length. If you cut the cord to 100 percent of the pole length, the elastic will lack sufficient pull to hold the segments snugly together when pitched. Conversely, cutting the cord shorter than 65 percent creates extreme tension that makes collapsing the poles difficult and strains the elastic core.
To calculate the measurement accurately, assemble your pole segments fully on the floor without any cord inside and measure the total length from tip to tip. Multiply that total measurement by 0.75 to determine your baseline relaxed cord length, then add approximately 12 to 18 inches for tying knots and gripping. Leaving that extra working length allows you to adjust the tension fine-tuning after threading rather than committing to a permanent cut prematurely. You can always trim excess tail after verifying the tension, but an overly short cord requires starting the entire process over.
Threading the Elastic Cord Through Pole Sections
Prepare the leading end of the new shock cord by briefly melting the synthetic outer jacket with a lighter to prevent fraying. If your replacement kit includes a thin steel lead wire, tightly tape the melted cord tip to the end of the wire using a small piece of electrical or masking tape. The stiff lead wire easily drops straight through hollow tube sections, pulling the flexible shock cord behind it without bunching up. If working without guide wire, gravity can help feed the cord if you hold each pole section vertically while threading.
Secure the starting end of the cord to the first pole terminal tip before threading subsequent segments. Thread the cord through a small metal washer, tie a firm overhand stopper knot or figure-eight knot at the tail, and test that the knot cannot pull through the washer or terminal plug. Seat the end plug securely back into the first pole tube so the anchor holds firm under tension. Now you can begin threading the free lead through each numbered section in precise sequence.
Thread the cord through the second and third sections, paying close attention to ferrule orientation. Each segment must align male-to-female in the exact direction needed for proper joint connection. As you advance past two or three segments, pull the slack through and use a spring clamp or binder clip on the exiting cord against the pole mouth. This temporary clamp keeps the internal cord under light tension and prevents previously threaded segments from sliding back off the line while you work on subsequent pieces.
Continue this methodical threading process until the guide wire exits the final segment of the pole assembly. When dealing with specialized poles or pre-curved sections, advance slowly to ensure the cord does not snag on internal junction shoulders. In contrast to integrated frames found on certain quick-pitch camping tents, traditional segmented poles require manual alignment at every ferrule joint. Keeping steady tension with your clamp allows you to feed the final section without fighting the cumulative elasticity of the entire assembly.
Securing the Terminal Knot and Fine-Tuning Tension
Once the cord emerges from the final pole segment, it is time to establish the final working tension. Assemble all the pole segments together end-to-end so the pole forms its complete rigid length on your work surface. Pull the loose cord exiting the final segment until you feel firm, positive resistance pulling the joints together. You want enough tension so the pole snaps securely into alignment when joints are brought near each other, but not so much tension that folding the pole feels overly difficult.
While holding the tensioned cord firmly with your fingers or a locking clamp, slide the second metal washer onto the line. Tie a secure figure-eight knot or double overhand knot against the washer at the measured tension point. Before cutting any excess cord, test the pole assembly by folding it into storage sections and popping it back together several times. If the pole feels too loose or excessively tight, simply untie the knot, shift the washer position along the cord, and retie.
Once you are completely satisfied with the tension balance, use sharp scissors to trim the excess cord tail, leaving roughly one inch of tail past the knot. Quickly singe the cut end with a lighter to fuse the fibers and prevent unraveling over time. Reinstall the terminal end tip or grommet plug over the knot assembly, pressing it firmly into the tube opening until fully seated. Your restringing process is now mechanically complete and ready for structural verification.
Field Verification and Post-Repair Inspection
Before packing the repaired pole away for your next outdoor excursion, conduct a thorough physical check of the entire structure. Snap all sections together into their fully extended configuration and gently flex the pole into an arch resembling its pitched shape on your tent. Observe each ferrule joint carefully to ensure the metal sleeves insert fully into adjacent tubes without leaving gaps. Incomplete ferrule seating under tension indicates that excess cord bunching or debris remains inside the joint, which could cause the pole to bend or crack under wind loads.
Practice breaking the pole down into its folded storage bundle to confirm proper cord relaxation. The recommended technique for folding collapsible tent poles is to break them down starting from the center rather than from one end. Disassembling from the middle distributes elastic strain evenly along both halves of the internal shock cord, reducing localized stretching. If the segments fold smoothly without extreme resistance and remain neatly aligned in your bundle, your repair was successful.
Common Mistakes to Avoid During Tent Pole Restringing
One frequent mistake during tent pole maintenance is cutting the replacement shock cord to final length before threading begins. Working directly from an uncut spool or leaving substantial extra tail prevents running out of cord before reaching the final segment. Elastic cord shrinks under tension and expands when relaxed, making pre-cut measurements prone to error. Always secure the first terminal end, thread the full pole, and trim only after the final knot location is verified under active tension.
Another common error involves neglecting to deburr metal edges or skipping small retaining washers. Bare knots can pull through tube openings under heavy pitching tension, causing sudden structural collapse while camping. Using included steel washers creates a broad, dependable barrier that keeps the knot securely seated outside the pole cavity. Taking time to file down jagged ferrule edges also preserves the outer braided sheath, ensuring your replacement cord provides seasons of dependable service.
Completing this maintenance project yourself saves money, reduces gear waste, and gives you valuable insight into how your camping shelter functions. A properly tensioned pole set makes pitching camp seamless and dependable, allowing you to focus on enjoying the outdoors rather than struggling with uncooperative gear.



Write Your Review
No reviews yet. Be the first to share your experience!