


Camping trips grind to an abrupt halt when structural tent poles lose their internal tension. Flexible shock cord holds segmented poles together, guiding aluminum or fiberglass tubes into their respective ferrules during pitch setup. Over seasons of temperature fluctuations, moisture exposure, and extended storage, internal latex strands stretch out and fail. Knowing how to rethread tent pole elastic allows campers to restore structural rigidity, prevent accidental pole separation, and maintain shelter integrity in adverse conditions. Campers relying on reliable shelter, such as heavy-duty weather-resistant camping tents, need poles that lock firmly into place against sudden wind gusts.
Replacing worn elastic cords is a straightforward maintenance task that requires only modest preparation and basic mechanical patience. Standard pole repair kits provide resilient replacement shock cords alongside useful guide wires and retention washers. Handling this repair before heading outdoors prevents frustrating pitch failures at remote campsites. Campers who appreciate the convenience of quick-pitch camping tents recognize that even the simplest tent geometries depend entirely on clean internal tension. Investing time into routine pole maintenance keeps gear fully functional across multiple camping seasons.


Restoring Tent Pole Structure Through Shock Cord Replacement
A segmented tent pole relies on constant internal elastic tension to keep ferrule joints seated and aligned. When that tension degrades, assembling a shelter becomes clumsy, slow, and prone to structural collapse during setup. Understanding the complete repair procedure restores original frame geometry while keeping poles neatly organized in their carry sacks. This practical walkthrough outlines the process of replacing fatigued shock cords across common pole types.
Why Tent Pole Elastic Loses Tension Over Time
Flexible shock cord consists of natural rubber cores bound within a woven polyester or polypropylene exterior. Intense heat inside vehicle trunks or storage sheds degrades these elastic polymers over time. Cold weather also stiffens rubber strands, making them prone to snapping when pulled taut during late-season trips. Moisture trapped within hollow pole segments can accelerate core rot if gear is packed damp.
Mechanical stress also accelerates elastic fatigue during normal ownership. Tent poles stored folded for months experience uneven tension along their internal cords, especially at sharp pivot points. Over multiple seasons, continuous tension robs the core of its natural rebound elasticity. Campers eventually notice that pole segments drift apart rather than snapping crisply together. Replacing the elastic remains the only reliable remedy when tension fails completely.
Selecting the Correct Shock Cord Diameter and Length
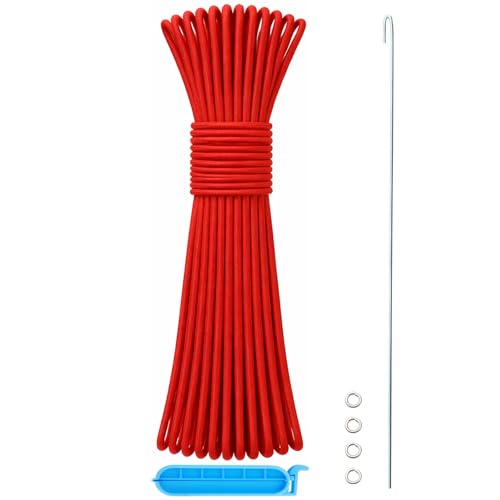
Matching cord diameter to internal pole clearance prevents excess friction during assembly. The two standard replacement diameters are 3/32-inch (2.5 millimeters) and 1/8-inch (3.18 millimeters). Lightweight backpacking shelters featuring narrow aluminum poles generally require a 3/32-inch cord, such as the BRILLIANCE4U Tent Pole Shock Cord 3/32 in 60ft option. Standard family camping shelters and fiberglass poles typically accommodate a 1/8-inch cord, like the Tent Pole Shock Cord 1/8 inch 60ft from Hibinew.
Cord construction directly affects both durability and outdoor resilience. Quality replacement cords feature natural latex rubber cores wrapped in tightly braided polypropylene. Natural latex maintains elasticity across broad temperature shifts, resisting sudden slackening in brisk mountain air. Polypropylene outer jackets resist abrasion against sharp metal ferrule edges during repeated frame setups. Oversized cord causes frustrating drag inside narrow channels, while undersized cord delivers weak tension.
Calculating cord length requires measuring the fully assembled pole. A dependable baseline is cutting replacement shock cord to roughly 70 to 80 percent of total pole length. This ratio creates sufficient pull to seat joints firmly without over-stretching the core during folding. Leaving extra cord during initial threading prevents accidental under-sizing mistakes. A 60-foot replacement roll provides plenty of material to repair several standard poles.
Essential Tools and Hardware for Pole Rethreading
Gathering the proper mechanical aids simplifies the entire rethreading job. A slender steel lead wire serves as the primary tool for navigating hollow aluminum or fiberglass sections. Without a guide wire, flexible shock cord bunches up against internal lips and refuses to pass through longer tubes. Repair sets from brands like BRILLIANCE4U and Hibinew conveniently include steel guide wire alongside the elastic.
Anchoring hardware holds the elastic secure at both pole terminals. Small steel washers, locking clips, or specialized end grommets prevent the knotted cord from slipping back inside the tube. Spring clamps or locking pliers help maintain tension while working across sequential sections. Sharp utility shears ensure clean cuts, while a lighter allows quick heat-sealing of cut ends. Masking tape helps label pole sections in sequential order.
Inspecting Pole Segments and Preparing the Work Area
Clearing a flat workspace prevents lost components and mixed-up tubes. A garage floor or long table provides enough room to lay out the full pole length. Numbering each section sequentially with tape avoids confusing the joint orientation. Ferrules are the sleeve extensions that receive adjacent tubes, and reversing them disrupts proper pole assembly.
Inspecting each section before threading prevents premature cord abrasion. Check tube edges for metal burrs or sharp rims that could slice into the polypropylene sheath. Aluminum sections require checks for hairline cracks near joint collars, while fiberglass poles need inspection for splintering. Swabbing internal channels with a pipe cleaner removes grit that could hinder the guide wire.
Removing Fatigued Elastic and Dismantling Tips
Dismantling begins at one terminal end of the pole assembly. Most camping poles secure shock cord with a friction-fit metal tip, screw-in plug, or captive washer. If the tip is pressed into place, gently pull it out using pliers wrapped in cloth to protect the metal finish. In some designs, untying an external stopper knot releases the hardware immediately.
Once the tip is free, cut the slack elastic cord near the knot and remove the metal hardware. Pull the old cord completely out from the opposite end, leaving the sections in their numbered order. If the cord snapped inside a tube, push a stiff wire through to clear broken fragments. Saving the original hardware ensures proper fit, though kits like the Tent Pole Shock Cord 1/8 inch 60ft supply fresh washers if factory pieces are missing.
Feeding Cord Through Segments Using Lead Wire
Preparing the replacement cord begins with heat-sealing the freshly cut tip with a flame. Melting the polypropylene jacket creates a smooth, tapered point that resists unraveling. Form a small hook on the steel guide wire, slip the elastic through, and crimp it flat with pliers. Wrapping thin electrical tape over the junction creates a sleek, snag-free profile.
Begin threading from the first section, pushing the lead wire smoothly through the interior channel. As the wire exits the far end, pull the attached elastic until several inches extend past the opening. Tie a reliable stopper knot, such as a figure-eight knot, around a steel washer at the starting end. Seat the washer firmly against the end tip, ensuring it cannot slip inward under tension.
Proceed through each consecutive section in order, feeding the lead wire through adjacent tubes. Maintain the male-to-female joint orientation established during disassembly. After threading every few sections, pull the excess cord taut to ensure it runs cleanly through ferrules without binding. Working methodically prevents the cord from twisting around itself inside the tubing.
Establishing and Securing Tension Across the Pole
Balancing tension determines how easily the pole assembles and folds. If the cord is strung too loosely, sections will drift apart during pitching, compromising frame stability in wind. If tension is excessive, folding the pole stretches the rubber beyond its elastic limit, causing early breakdown. The cord should seat joints firmly while permitting smooth separation during teardown.
Securing tension while threading the final sections requires temporary clamping. Pull the cord through the penultimate segment until achieving roughly 20 to 30 percent stretch beyond resting length. Clamp locking pliers or a spring clamp onto the cord where it exits the tube to lock that tension. This temporary hold frees both hands to finish the final section without fighting elastic recoil.
Pass the cord through the final section, slide on the finishing washer, and tie a firm figure-eight knot. Release the clamp slowly, letting the knot and washer seat inside the terminal opening. Test the tension by pulling adjacent sections two inches apart and releasing them. They should snap cleanly back into the receiving ferrules without hesitation.
Verifying Assembly and Folding Mechanics
Testing the assembled pole under gentle curve pressure confirms structural integrity. Connect every joint on the ground, making sure tubes seat completely into their ferrules. Gently flex the pole into an arch resembling its pitched shape on a tent canopy. Inspect each joint to confirm the elastic holds the frame interfaces flush under moderate curve tension.
Evaluating the folding sequence is equally vital for long-term gear performance. Break down the pole starting from the center rather than one end, working outward to distribute stretch evenly. Large family camping shelters, including spacious outdoor tents, feature long multi-segment poles requiring balanced tension during pack-down. The pole should fold into neat bundles without pulling forcefully against the cord at pivot points.
Troubleshooting Snags, Blockages, and Joint Misalignments
Encountering resistance while feeding cord usually points to internal obstructions. Aluminum corrosion, dirt, or fragments of old rubber can lodge inside narrow ferrule openings. If the guide wire stops, remove it and check the tube interior with a small flashlight. A stiff wire or cleaning rod easily pushes stubborn debris out of the channel.
Ferrules that detach from fiberglass shafts require immediate attention before completing rethreading. If a metal sleeve slips loose, clean the exposed tube with alcohol and reattach the ferrule using multi-purpose epoxy. Allow the adhesive to cure fully before applying tension to the new cord. Threading through a loose sleeve risks pinching the elastic or damaging the tube.
Uneven tension along different sections indicates internal cord binding or twisting. This issue happens when the elastic rotates during the threading sequence. To fix this, untie the terminal knot, let the cord spin to relieve torsional stress, and re-anchor the end tip. Straight cord alignment guarantees consistent pull strength along the entire frame.
Best Practices for Long-Term Pole Preservation
Extending the lifespan of newly installed shock cord begins with thorough post-trip drying. Never pack damp poles into airtight bags, as trapped moisture promotes corrosion inside ferrules and rots rubber cores. Separate pole sections slightly during gear drying after rainy trips, allowing air into hollow shafts. Proper maintenance is just as important for specialized shelters, such as dark-room camping setups featuring dark-room camping tents, where sturdy frames support dense fabrics.
Careful handling during camp setup preserves internal elastic strands for years. Avoid whipping pole sections together during pitching, as sudden impacts can nick metal edges and cut internal cord. Seat ferrule joints fully by hand before applying bending stress to canopy sleeves. During camp teardown, fold poles from the center outward to balance tension across all internal sections.
Storing tent poles in climate-controlled indoor spaces prevents rapid polymer breakdown. High temperatures in attics and trunks quickly sap rubber flexibility, leaving cords limp after a single hot season. Storing poles partially assembled or in loose loops during the off-season relieves ongoing mechanical strain. Routine inspection and timely cord replacement keep camping shelters dependable through every season.


Write Your Review
No reviews yet. Be the first to share your experience!